
Step-by-Step Guide: Crafting Your Dream Garden Path with Natural Materials
Creating your dream garden path with natural materials is a rewarding DIY project that can transform your outdoor space into a personal oasis. Whether you’re a seasoned gardener or just starting out, building a garden path adds charm and functionality to your landscape design. From choosing the right natural materials to laying out a design that complements your garden’s style, this guide will walk you through each step. Imagine strolling down a beautifully crafted outdoor walkway, surrounded by the lush greenery you love. Let’s get started on turning that garden path vision into reality, with tips and tricks that make the process fun and easy. For more inspiration, check out this guide on building a perfect path.## Choosing the Right Natural Materials

Selecting the perfect natural materials for your garden path is crucial for creating a beautiful and long-lasting outdoor walkway. Let’s explore some popular options for stones and wooden accents that can bring your vision to life.
Selecting Stone Types
Natural stone is a popular choice for garden paths, offering durability and timeless beauty. Hilton Landscape Supply recommends considering factors like color, texture, and local availability when choosing stones.
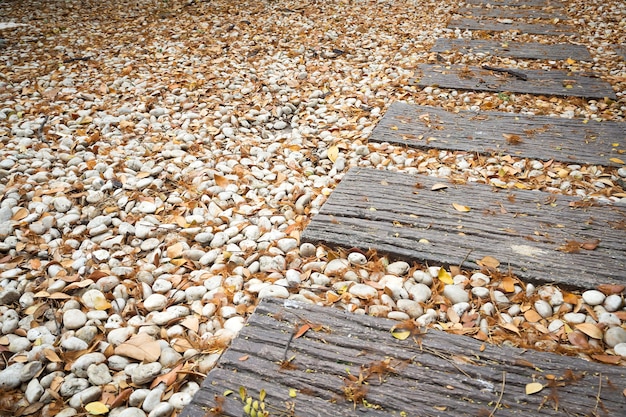
Flagstone, with its flat surface and irregular shapes, creates a rustic, natural look. It’s ideal for informal garden paths and comes in various colors like blue, red, and tan.
For a more uniform appearance, consider cobblestones or brick pavers. These materials offer a classic look and are often easier to install due to their consistent shapes.
Gravel is another option, providing a crunchy texture underfoot and excellent drainage. It’s budget-friendly and easy to maintain, making it perfect for casual garden paths.
Picking Wooden Accents
Wooden elements can add warmth and character to your garden path. Consider incorporating these natural accents to complement your stone choices and enhance the overall aesthetic of your outdoor space.
Railway sleepers or reclaimed timber can create charming path edges or steps. These rustic materials weather beautifully over time, blending seamlessly with your garden’s natural elements.
For a more refined look, consider using wooden boardwalks in sections of your path. This works especially well in areas with uneven terrain or over water features.
Wooden chips or bark can be used as a soft, natural mulch between stepping stones. This not only looks great but also helps suppress weeds and retain moisture in the soil.
Designing Your Garden Path

A well-designed garden path not only guides visitors through your outdoor space but also enhances the overall landscape. Let’s dive into the key aspects of planning your path’s layout and shape.
Mapping Out the Path
Before you start digging, it’s essential to plan your garden path carefully. Lowe’s guide suggests beginning with a clear vision of your path’s purpose and destination.
Start by sketching your garden layout on paper. Mark key features like flower beds, trees, and structures. This will help you visualize how your path will interact with existing elements.
Consider the path’s width carefully. A width of 3 to 4 feet is comfortable for most garden paths, allowing two people to walk side by side.
Think about the path’s start and end points. Does it lead to a specific destination, like a seating area or garden feature? Or is it meant for leisurely strolls through your garden?
Don’t forget to account for drainage. Ensure your path has a slight slope away from any structures to prevent water accumulation.
Curves and Straight Lines
The shape of your garden path can significantly impact the overall feel of your outdoor space. Both curved and straight paths have their place in garden design, depending on your style preferences and the layout of your yard.
Curved paths create a sense of mystery and encourage exploration. They work well in informal, naturalistic gardens and can make small spaces feel larger by obscuring the full view.
Straight paths, on the other hand, provide a sense of order and direction. They’re ideal for formal gardens or when you want to create a strong visual line to a focal point in your landscape.
Consider mixing both elements for a balanced design. You might use straight sections for primary walkways and curved paths for secondary routes through garden beds.
Building Your Outdoor Walkway
Now that you’ve chosen your materials and designed your path, it’s time to bring your vision to life. Let’s walk through the process of preparing the ground and setting your chosen materials in place.
Laying the Foundation
A solid foundation is crucial for a long-lasting garden path. Backyard Boss emphasizes the importance of proper ground preparation before laying your materials.
-
Mark out your path using stakes and string or a garden hose for curved designs.
-
Dig out the path to a depth of about 4-6 inches, plus the thickness of your chosen material.
-
Create a slight slope away from any structures for proper drainage.
-
Compact the soil using a plate compactor or hand tamper.
-
Add a layer of landscape fabric to prevent weed growth.
Finally, add a base layer of crushed stone or sand, about 2-3 inches deep. Compact this layer thoroughly to create a stable foundation for your path materials.
Setting the Stones
With your foundation prepared, it’s time to lay your chosen path materials. STIHL’s guide offers helpful tips for this crucial step in creating your garden path.
Begin at one end of your path, placing your stones or pavers according to your design. Use a rubber mallet to gently tap each piece into place, ensuring it’s level with its neighbors.
For a natural look, vary the spacing between stones slightly. This works particularly well with irregular shapes like flagstones.
Fill the gaps between stones with your chosen material – this could be more gravel, sand, or even low-growing plants for a lush, green look.
Once all stones are in place, sweep a layer of fine sand over the path and into the cracks. Water lightly to help settle the sand, then repeat the process until all gaps are filled.